Wick Reclaims: Read Bullish and Bearish Continuation
Identify a candle body reclaiming an earlier wick, distinguish a full reclaim from a brief touch, and use the completed pair to read trend continuation.
Candlestick Reading for Beginners
Browse the lessons
The foundations
Reading a single candle
Reversal combinations
Momentum, continuation & breakouts
- Wick Reclaims: Read Bullish and Bearish Continuation5 min read · You are here
- Three-Candle Continuation: Identify the Next Push5 min read
- Three White Soldiers and Black Crows: Read the Direction5 min read
- Rising and Falling Three Methods: Spot Trend Continuation5 min read
- Breakout Candles: Identify Bullish and Bearish Breaks5 min read
A completed reclaim points back in the direction of the move
When an uptrend leaves a long upper wick and the next green body moves through that wick to close above it, the completed pair has a bullish continuation reading. Buyers have recovered the price area that the earlier candle could not hold.
The downward mirror is bearish: a red body covers an earlier lower wick and closes beneath it, supporting renewed downward movement. Read the completed sequence rather than letting the first wick's rejection override the later reclaim.
This article uses a defined two-candle price-action setup. Wick reclaim is a descriptive label here, not a claim that every platform uses the same pattern name.
How to identify a full body reclaim
First identify two adjacent completed candles and an existing directional move.
| Check | Bullish reclaim | Bearish reclaim |
|---|---|---|
| Background | Upward move | Downward move |
| First candle | A clear upper wick | A clear lower wick |
| Area to mark | Top of body to high | Low to bottom of body |
| Second candle | Green body opens at or below the wick base and closes above its high | Red body opens at or above the wick top and closes below its low |
| Main reading | Bullish continuation | Bearish continuation |
The second body must cover the entire marked wick. A new high or low made only by another wick does not pass this rule. All prices below are illustrative; green means close above open and red means below.
See the bullish reclaim complete
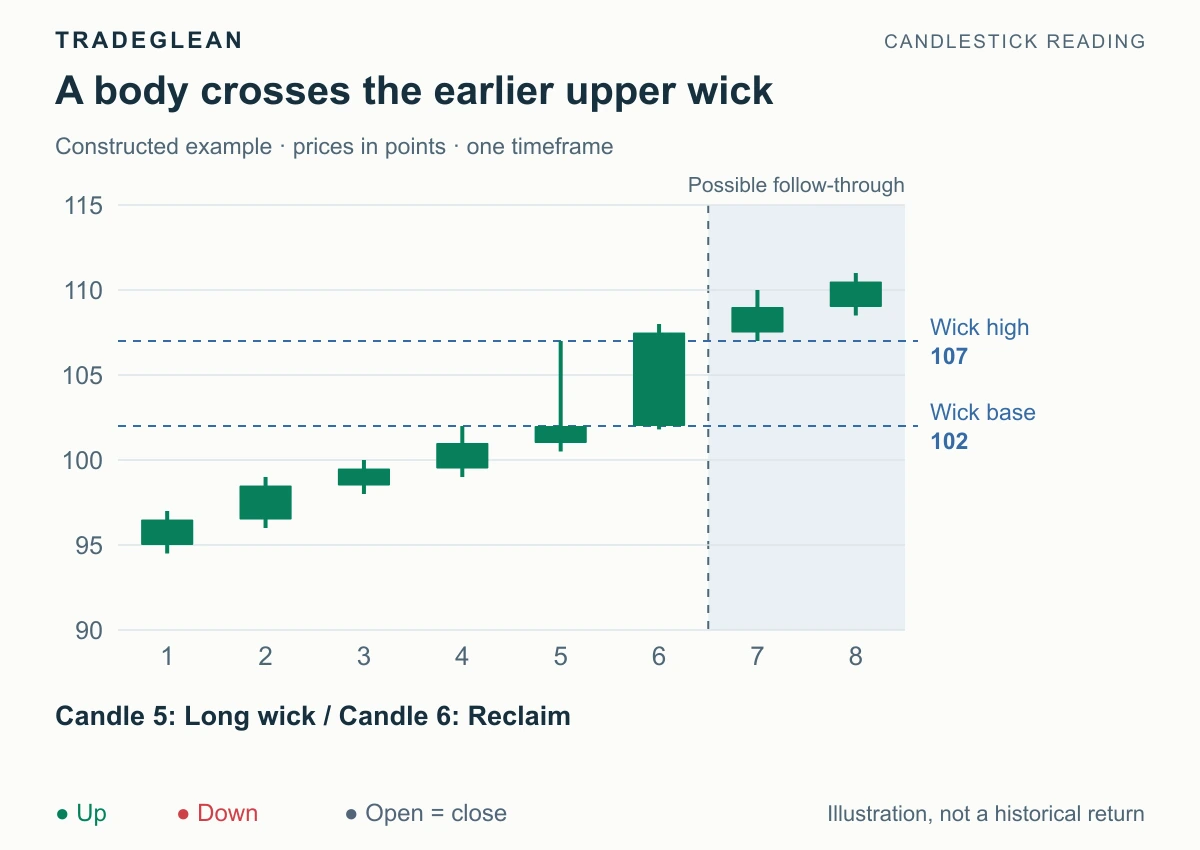
The sequence completes at candle 6. Candles 7 and 8 show subsequent upward follow-through.
Candle 5 opens at 101, reaches 107, falls to 100.5, and closes at 102. Its upper wick runs from 102 to 107. Mark that interval rather than the whole candle.
Candle 6 opens at 102 and closes at 107.5. Its green body covers the full five-point wick and finishes beyond the earlier high. The reclaim is complete, so the primary scenario is upward continuation.
The important change is from a temporary rejection at candle 5 to a close above the rejected area at candle 6. A bearish interpretation based solely on the old upper wick has lost its basis. Watch whether the market now holds around the cleared 107 boundary and makes further upward progress.
A reclaim is easier to use when it agrees with an existing uptrend and clears a recognizable local obstacle. If a much larger resistance area sits just above it, keep that area in the plan.
A touch is the near-miss to avoid
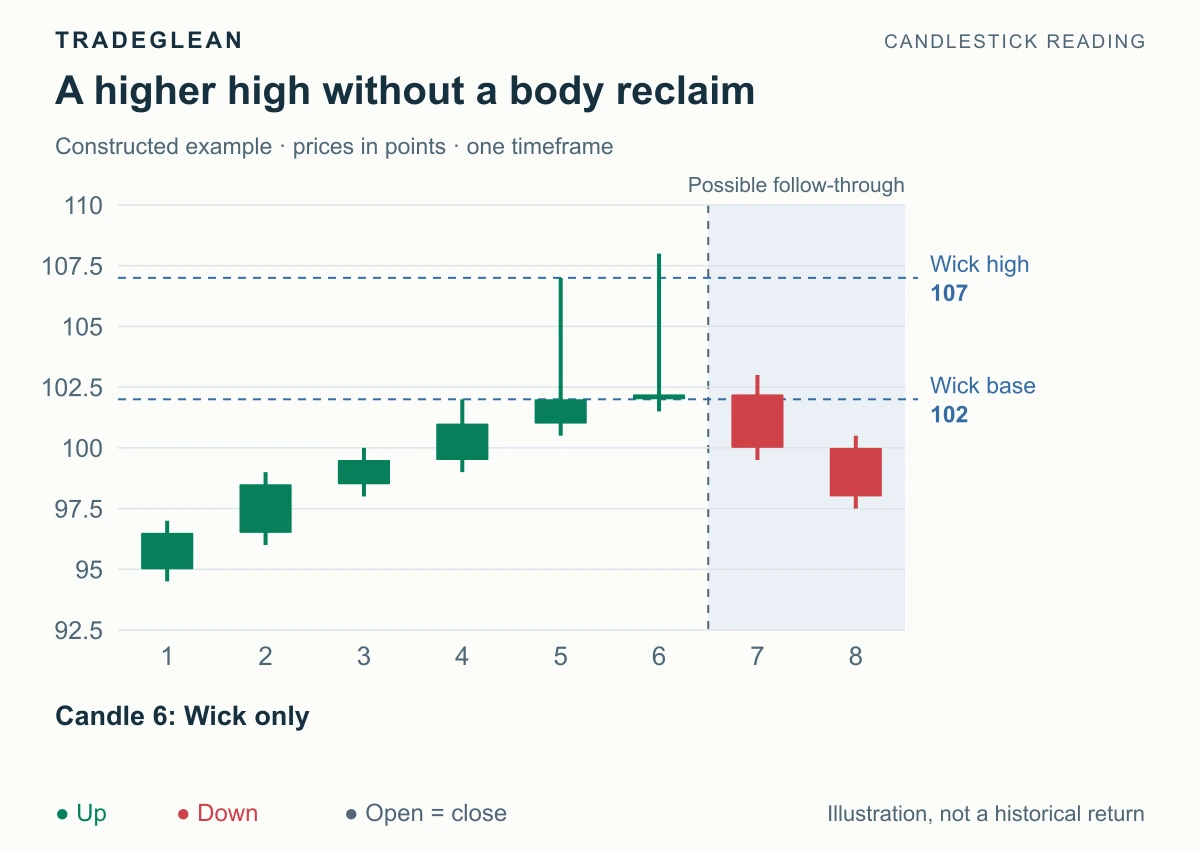
The first five candles are the same. Candle 6 crosses the old high intraperiod but does not reclaim it with its body.
Here the second body spans only 102–102.2. The high reached 108, but the close surrendered that move. This does not complete the bullish reclaim. Repeated upper-wick rejection at resistance instead deserves a bearish review if price begins to break lower.
The difference is visible and measurable: close 107.5 completes the first chart's reclaim; close 102.2 leaves the second chart's rejection intact. You are studying different completed sequences, not assigning opposite forecasts to an identical finished setup.
A gap above the wick also has a different structure. It may show upward strength, but the body has jumped past the interval rather than covered it. Record it as a gap, not as this full-body reclaim.
Apply the bearish mirror
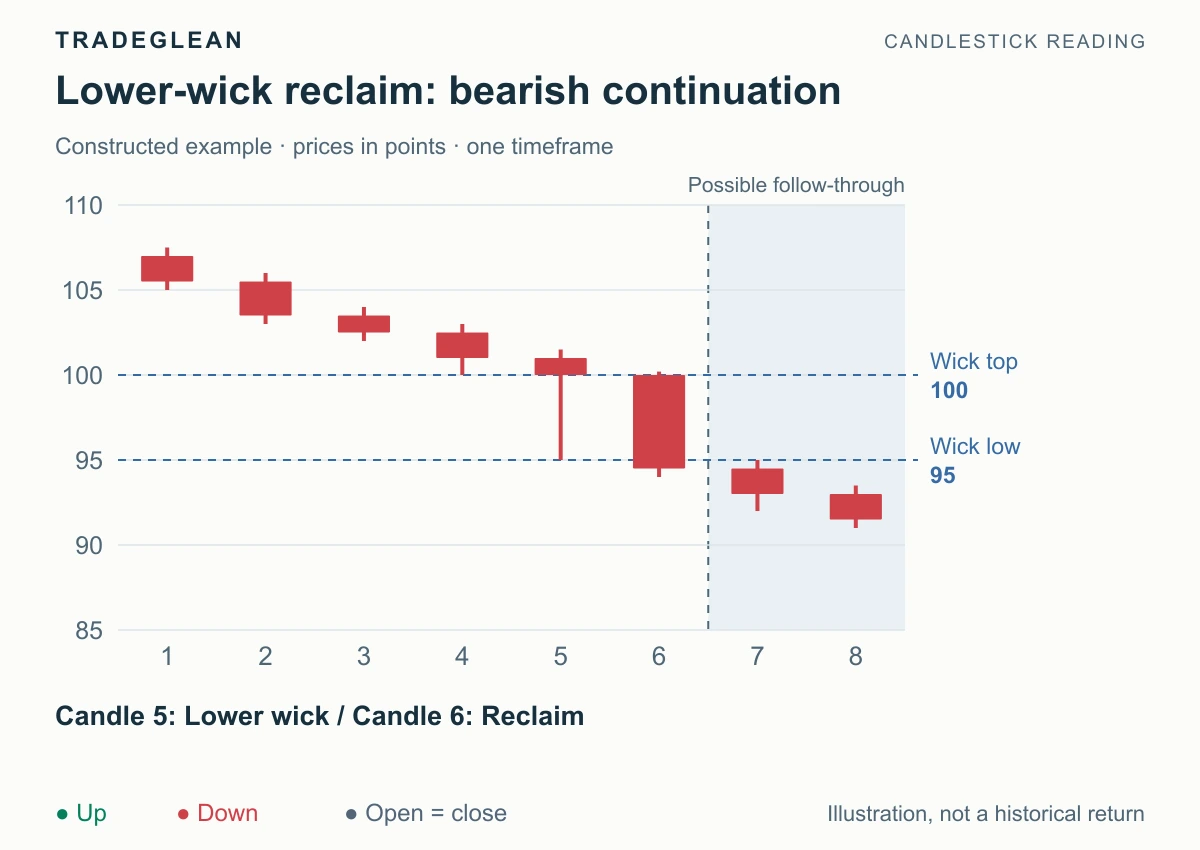
The downward mirror: candle 6 closes at 94.5, completing a bearish reclaim.
Suppose a candle in a downtrend opens at 101, closes at 100, and reaches a low of 95. Its lower wick runs from 95 to 100. A following red candle opens at 100 and closes at 94.5.
That body covers the lower wick and closes beneath it. Favor bearish continuation, with 95 as the cleared boundary to watch on a rebound. Earlier support beneath the new close is the next obstacle; the completed structure's high is a possible invalidation reference depending on the plan.
A slower reclaim can take several consecutive bodies. For example, 102–104, 104–106, and 106–107.6 together recover an upper-wick interval. Label that a multi-candle reclaim and mark completion at the final close. Keep it separate from the two-candle rule.
Use the direction without chasing the move
For an existing long position, the bullish reclaim is evidence of continued upward progress. Apply the existing exit and protection rules while checking the next resistance. For a new position, calculate the entry available now.
In the first chart, an entry reference of 107.6 and a protective reference of 100.3 create 7.3 points of price risk. If prior resistance is 112, there are only 4.4 points to that obstacle, about 0.60R. That is a bullish setup with limited space for this particular entry.
A later pullback that holds the reclaimed area could produce a different structure and stop distance. Wait for that structure to form before assigning a tighter stop. The trading-plan walkthrough gives a complete example of matching direction, entry, and risk.
When the continuation reading weakens
For the bullish version, a close back beneath the cleared wick high warns that follow-through is weakening. Losing the wick base gives back the whole reclaim. A break of the structure's chosen protective boundary invalidates the plan. Reverse those directions for the bearish version.
Write the warning level and the actual stop separately. A closing review does not override an intrabar protective order that has already triggered.
Recognition check
An upper wick spans 102–107. The next candle opens at 102, reaches 108, and closes at 106.9. Has the bullish reclaim completed?
Answer: No. The close must be above 107 under this rule. If it closes at 107.5 instead, the full-body reclaim is complete and supports bullish continuation in the stated upward context.
References
StockCharts: Introduction to Candlesticks explains body and wick measurements. Support and Resistance explains the prior levels used for context. The reclaim rules above are stated educational rules, not a tested win-rate claim.