Engulfing Patterns: Recognize Bullish and Bearish Reversals
Identify bullish and bearish engulfing patterns by comparing two candle bodies, then use location, confirmation, and invalidation to read the next move.
Candlestick Reading for Beginners
Browse the lessons
The foundations
Reading a single candle
Reversal combinations
Momentum, continuation & breakouts
- Wick Reclaims: Read Bullish and Bearish Continuation5 min read
- Three-Candle Continuation: Identify the Next Push5 min read
- Three White Soldiers and Black Crows: Read the Direction5 min read
- Rising and Falling Three Methods: Spot Trend Continuation5 min read
- Breakout Candles: Identify Bullish and Bearish Breaks5 min read
Engulfing shows a shift in directional pressure
A bullish engulfing pattern after a decline favors an upward reversal. A bearish engulfing pattern after a rise favors a downward reversal. The second candle takes back the first candle's entire body and finishes beyond it, showing a meaningful change in the open-to-close movement.
Give these setups priority at support and resistance. A bullish pair at the end of a pullback directs attention toward renewed buying; a bearish pair at the end of a rally directs attention toward selling. The next task is to verify that the bodies actually engulf.
How to identify an engulfing pattern
The pattern uses two adjacent completed candles of opposite colors. Compare their body edges before comparing their wicks.
| Check | Bullish engulfing | Bearish engulfing |
|---|---|---|
| First candle | Red body | Green body |
| Second candle | Green body covering the first body | Red body covering the first body |
| Clear strict example | Opens below the first close; closes above the first open | Opens above the first close; closes below the first open |
| Reversal location | After a decline or downward pullback | After an advance or upward rally |
| Primary direction | Up | Down |
The second candle does not need to cover the first candle's wicks. Engulfing the complete high-to-low range is an additional feature, not the basic body requirement.
Some definitions allow one shared body edge, as often happens when a candle opens exactly at the preceding close. The main figures use strict extension beyond both edges. Label shared-edge versions consistently when keeping a practice record.
A bullish pair: measure it, then use it
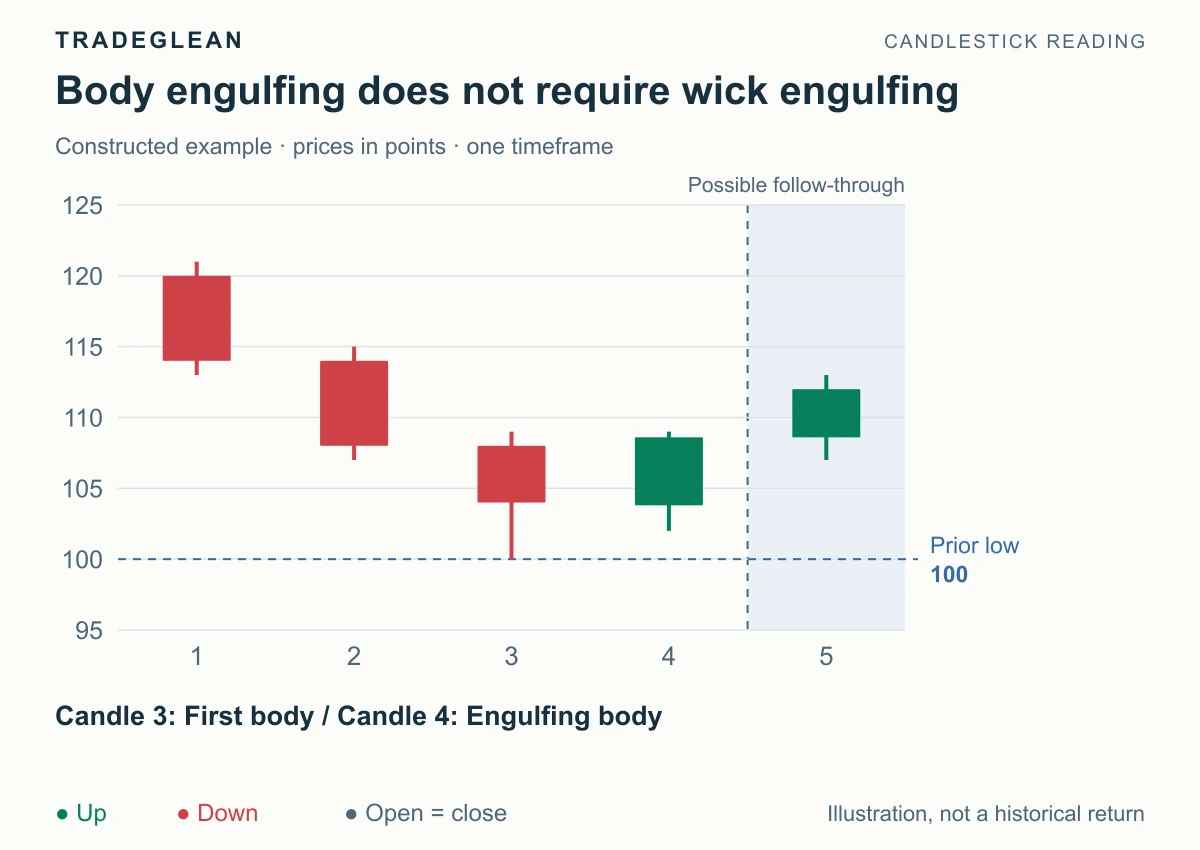
Constructed example in price points. Green closes above open; red closes below. The pattern ends at candle 4, with later information starting at 5.
Candle 3 opens at 108 and closes at 104, placing its body between 104 and 108. Candle 4 opens at 103.8 and closes at 108.6. Its body covers 103.8–108.6, extending below and above the previous body.
Candle 3's low is 100, while candle 4's low is 102. The lower wick remains uncovered, but the body test passes. After the preceding decline, the primary reading is bullish recovery: buyers have taken back the previous candle's open-to-close loss.
For a closing-confirmation approach, watch for a subsequent close above the pair's high. If the pair formed at prior support, a later pullback that holds that area can offer a separate entry setup. Mark the pair's combined low before planning protection; the lowest point may belong to the first candle.
The upward candle to the right illustrates follow-through. It confirms the direction later; it is not part of the original two-candle definition.
A bearish pair: the opposite body takeover
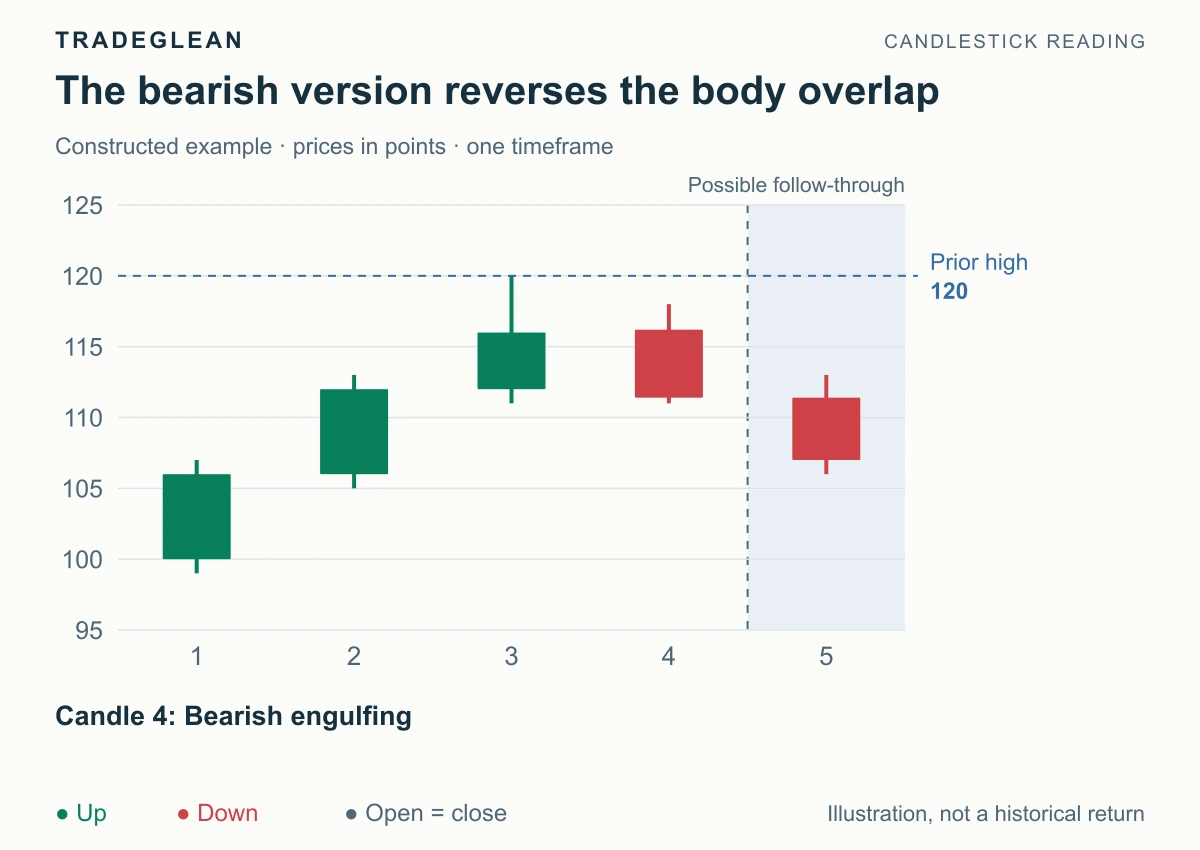
Candle 3 has a body from 112 to 116. Candle 4's red body runs from 116.2 down to 111.4.
The red candle erases the prior green body's gain and closes below its open. The working view is bearish, especially if the pair rejects resistance after a rally.
The previous high is 120, above the second candle's high of 118. That uncovered upper wick matters for protection even though it does not affect the engulfing definition. A plan based on the whole pair holding below its high should use 120 as the structural reference, rather than overlooking the earlier wick.
Watch for a close below the pair's low to confirm downward follow-through. Earlier support is the first area to assess for a target or reaction. In an existing downtrend, a bearish pair after a rebound can instead mark the resumption of that downtrend.
Choose the clearer examples
A substantial second body finishing near its directional extreme provides a cleaner signal than a tiny body with long wicks on both sides. Compare it with nearby candles on the same timeframe. The point is to see an actual shift in price movement, not a technical match around a nearly invisible first body.
Use three practical filters: a clear preceding move, a relevant level, and room toward the next obstacle. If a green candle engulfs several consecutive earlier bodies, record the extra coverage after checking the immediately preceding pair. Do not select nonadjacent candles to manufacture an engulfing pattern.
Invalidation: the pair loses its protective boundary
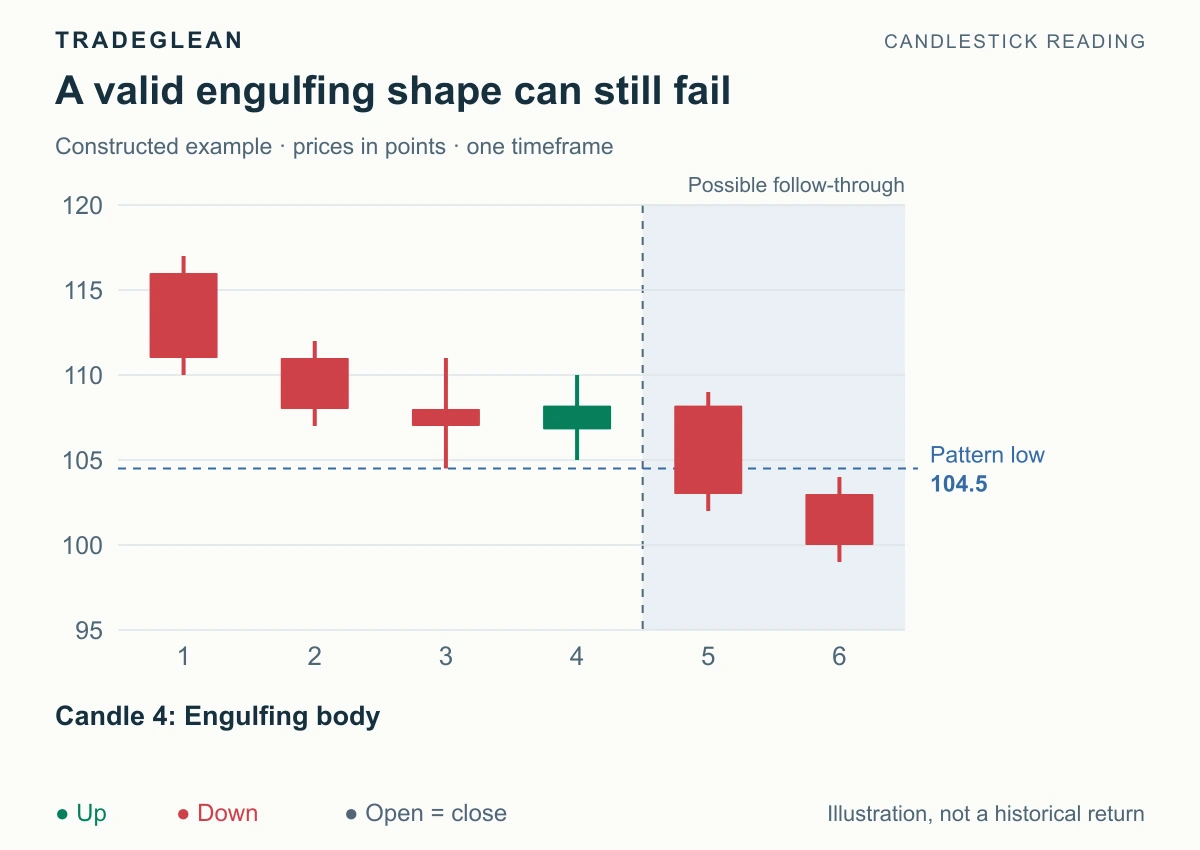
The two bodies meet the strict rule, but candle 5 closes at 103 beneath the pair's 104.5 low.
The bullish setup is invalidated when that low breaks. For a bearish setup, a recovery above the combined high is the mirror condition. This is where you drop the original view, rather than continue describing the pattern as strong after its boundary has failed.
An entry also needs enough space. Directional confidence cannot create room through nearby resistance or support. Use the trading-plan guide to separate a sound directional reading from an unsuitable entry price.
Recognition check
A red candle has a body from 108 to 104 and a low of 100. The next green candle opens at 103.8, closes at 108.6, and has a low of 102. Is it bullish engulfing?
Answer: Yes: its body covers both edges of the first body. The uncovered lower wick does not disqualify it. After a decline at support, the primary view is bullish; the pair low remains the invalidation reference.
Next, compare complete body recovery with piercing patterns and dark cloud cover.
References
StockCharts: Bullish Engulfing and Bearish Engulfing give the body-based definitions. The figures illustrate scenarios, not measured performance.