Shooting Star vs. Inverted Hammer: Which Way to Read It?
Identify long-upper-wick candles and distinguish a bearish shooting star at resistance from a bullish inverted-hammer setup after a decline.
Candlestick Reading for Beginners
Browse the lessons
The foundations
Reading a single candle
Reversal combinations
Momentum, continuation & breakouts
- Wick Reclaims: Read Bullish and Bearish Continuation5 min read
- Three-Candle Continuation: Identify the Next Push5 min read
- Three White Soldiers and Black Crows: Read the Direction5 min read
- Rising and Falling Three Methods: Spot Trend Continuation5 min read
- Breakout Candles: Identify Bullish and Bearish Breaks5 min read
An upper-wick rejection at resistance is a bearish setup
After a rally into resistance, a candle with a long upper wick and a small body near its low is a shooting star. Its main message is bearish: the upward attempt was rejected, so prepare for a downward pullback. A close below the candle's low supports that reading; a recovery above its high cancels it.
A similar outline after a decline is called an inverted hammer in standard English candlestick terminology. That is a bullish reversal setup requiring upward confirmation. Keeping these two locations separate prevents an upside-down shape from being assigned the wrong direction.
How to recognize the shape and choose the name
Both use one completed candle:
- A small, visible body near the bottom of the whole range.
- An upper wick at least roughly twice the body's length.
- Little or no lower wick.
- A preceding move that establishes whether the location is a rally high or a decline low.
| Check | Shooting star | Inverted hammer |
|---|---|---|
| Preceding move | Rise or rally into resistance | Decline into a potential support area |
| Primary reading | Bearish reversal setup | Bullish reversal setup |
| Confirmation used here | Close below the signal low | Close above the signal high |
| Invalidation | Recovery above the wick high | Break below the signal low |
The body can be green or red. A large lower wick would spoil the clean shape. An almost invisible body belongs closer to a gravestone doji.
Shooting star: follow the bearish case
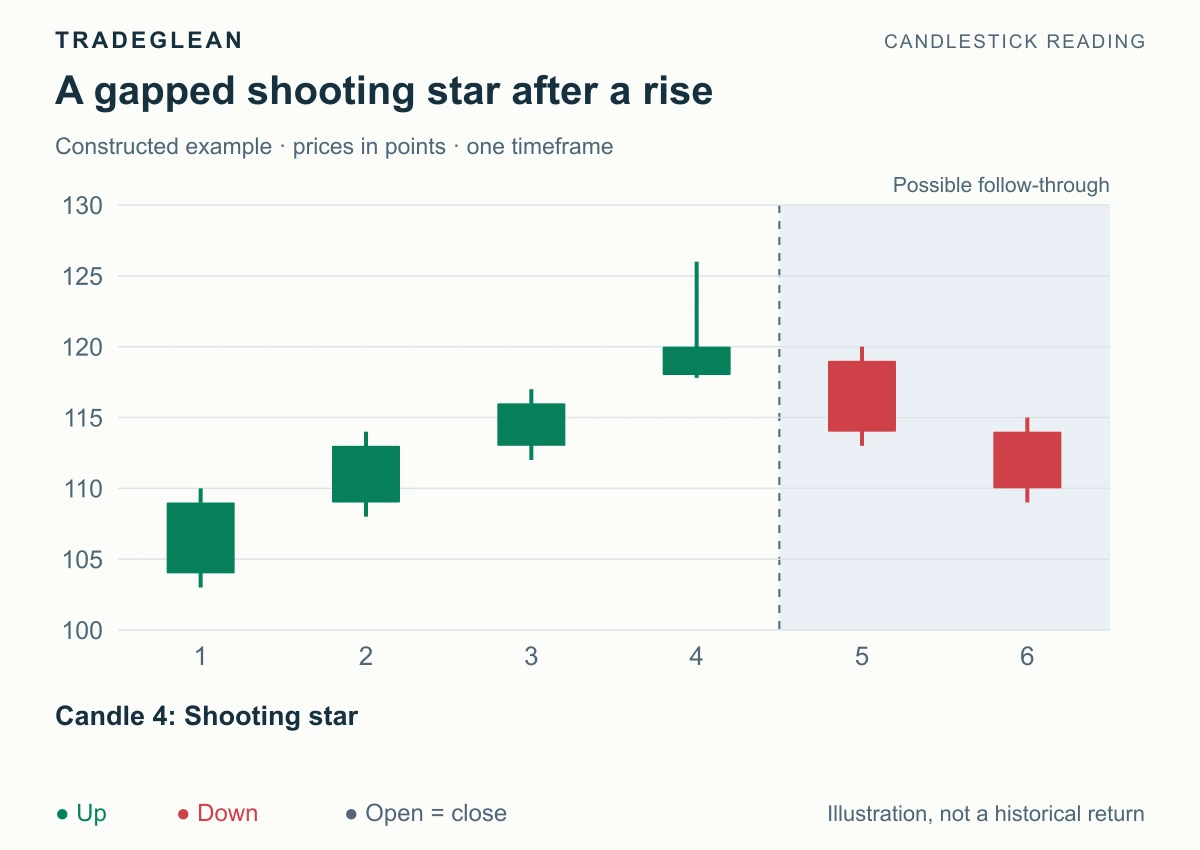
Constructed example with equal time periods. Green means close above open and red means below. The signal is candle 4; subsequent candles begin at 5.
Candle 4 opens at 118, reaches 126, falls to 117.8, and closes at 120. Its body is 2 points, its upper wick 6, and its lower wick 0.2. The upper wick is three times the body, and the preceding candles have been rising.
The candle finishes well below 126 despite reaching that price. Favor a downward pullback from this rejection. A prior resistance area around the wick would strengthen the location-based explanation; check that on the full chart rather than assuming this small illustration proves it.
For the closing-confirmation method, watch below 117.8. Candle 5 closes at 114 and candle 6 moves lower, so the illustrated sequence follows the bearish scenario. The high at 126 remains the boundary that a rejection-based bearish plan cannot ignore.
A bearish long-upper-wick candle can also form when a rally in a broader downtrend meets resistance. In that case the practical direction is still down, but the larger interpretation is continuation of the downtrend. Describe that context explicitly.
Inverted hammer: a different location and an upward trigger
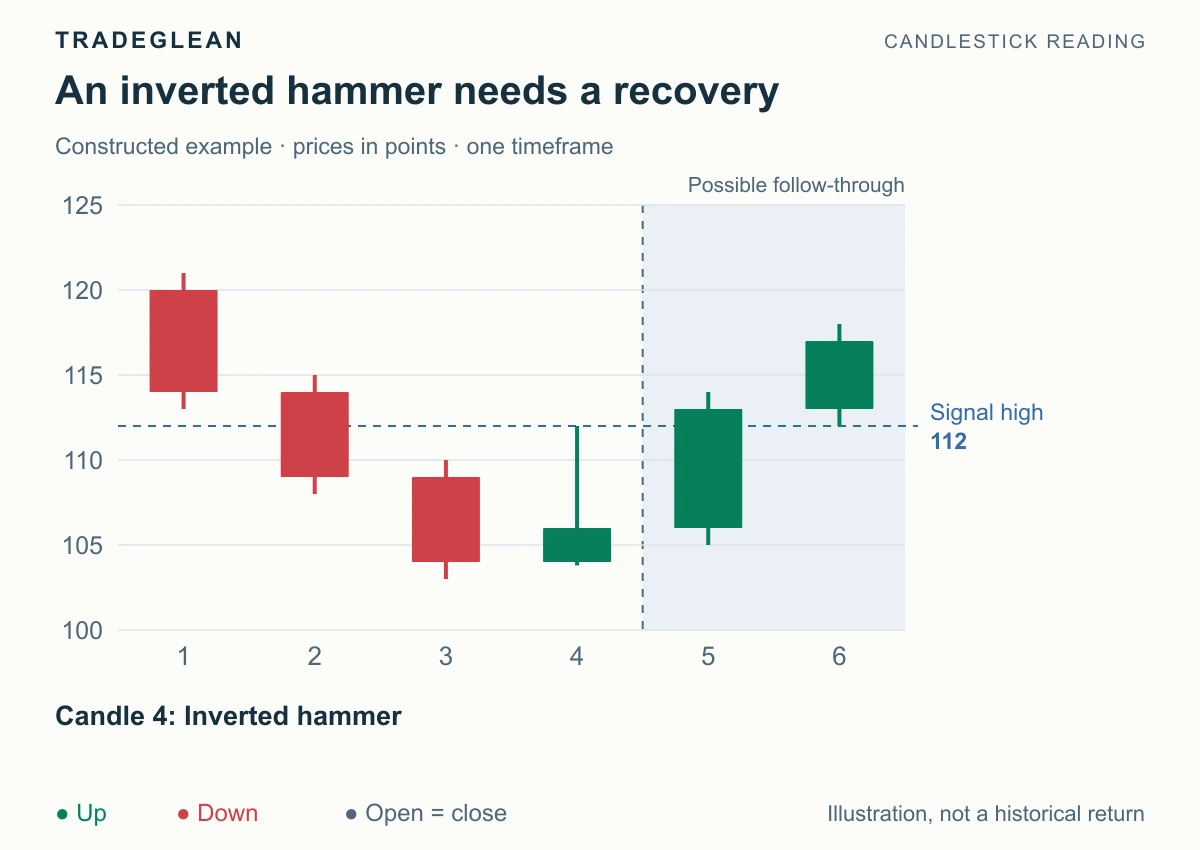
Candle 4 appears after falling prices. The later upward move begins at candle 5.
Here, candle 4 opens at 104, reaches 112, falls to 103.8, and closes at 106. The same 2-point body and 6-point upper wick now appear after a decline.
Its bullish interpretation comes from an upward attempt emerging within that decline. Because much of the attempt was surrendered, require a recovery above the wick before treating the turn as confirmed. Candle 5 closes at 113, above 112, and candle 6 advances again.
The practical note is “bullish reversal setup; wait above 112; cancel below 103.8.” It is not the same setup as selling a shooting star after a rally. The name, location, and trigger should appear together in your journal.
Gaps and pin bars: recognize the variant you have
The shooting-star chart shows a body gap: candle 3 closes at 116, while candle 4 opens at 118. Traditional descriptions often include this separation. On a continuous-price chart, the candle may open near the preceding close. Label that a no-gap shooting-star shape and retain the bearish resistance-rejection logic.
A pin bar is a broader price-action label for a small-body candle with one dominant wick. Individual methods use different proportions and location filters. It is a single-candle description, not a general name for engulfing patterns or other multi-candle combinations.
A clear identification note is more useful than a loose nickname: “long upper wick, small body near the low, after a rally into prior resistance, no opening gap.”
What invalidates the reading
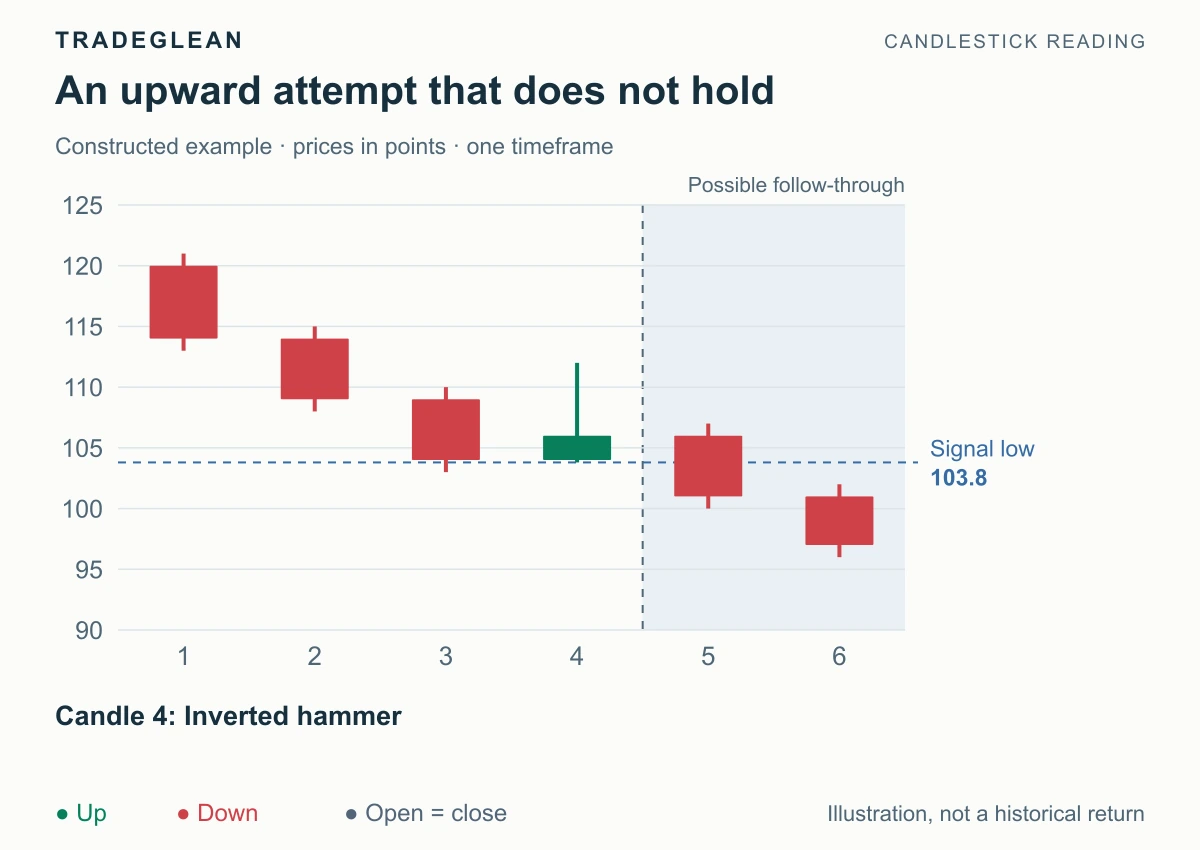
Candle 5 closes at 101 without first clearing 112. The bullish recovery setup is canceled.
The downward move in this chart shows that the bullish setup never confirmed. Once the low breaks, drop the recovery idea and follow the new bearish evidence.
For a shooting star, use the mirror: recovery above the rejected high invalidates the bearish setup. Define any stop separately from a closing review rule, since an intrabar stop can trigger before the candle finishes.
Also check the next support or resistance before entering. A clear direction and an affordable stop distance are separate requirements; the trading-plan walkthrough connects them.
Recognition check
A small red body near the candle low has an upper wick three times its size and almost no lower wick. It forms after a rise into resistance. How should you read it?
Answer: A shooting-star shape with a bearish bias. Watch for a close below its low and drop the rejection idea if price recovers above its high. If the same shape follows a decline, check it as an inverted hammer and require an upward trigger instead.
References
StockCharts: Introduction to Candlesticks and Bearish Reversal Patterns explain the English naming and gap conventions. All prices shown here are illustrative.