Candlestick Replay: Practice the Signal, Direction, and Plan
Practice recognizing candlestick setups, choosing a directional bias, and following an entry plan before revealing the next candles.
Candlestick Reading for Beginners
Browse the lessons
The foundations
Reading a single candle
Reversal combinations
Momentum, continuation & breakouts
- Wick Reclaims: Read Bullish and Bearish Continuation5 min read
- Three-Candle Continuation: Identify the Next Push5 min read
- Three White Soldiers and Black Crows: Read the Direction5 min read
- Rising and Falling Three Methods: Spot Trend Continuation5 min read
- Breakout Candles: Identify Bullish and Bearish Breaks5 min read
Make a directional call before revealing the next candle
Replay turns a pattern definition into a decision. Pause the chart, identify the shape, state the direction you favor, and write the condition that would confirm or invalidate it. Then reveal the next candle and follow the plan you recorded.
The exercises below use constructed prices. They include a complete bullish entry plan, a bullish recovery with poor entry space, and a bullish setup that later fails. Their purpose is to practice decisions, not to estimate how often a pattern wins.
Green candles close above their opens; red candles close below. Every decision uses only the candles visible at its pause point.
Know which patterns you are trying to recognize
Two definitions appear in this walkthrough:
| Pattern | Recognition requirements | Primary direction |
|---|---|---|
| Bullish engulfing | Red candle followed by a green body that covers it, after a decline | Bullish recovery |
| No-gap morning-star variant | Large red body, small middle body, then a green close above the first body midpoint, without isolated body gaps | Bullish recovery |
Use the engulfing guide and morning-star guide for the full visual checklists. Recognition comes before the direction and entry calculations; a candle that fails the definition should not be awarded the label because the later move looks attractive.
Exercise 1: recognize a bullish setup with room to act
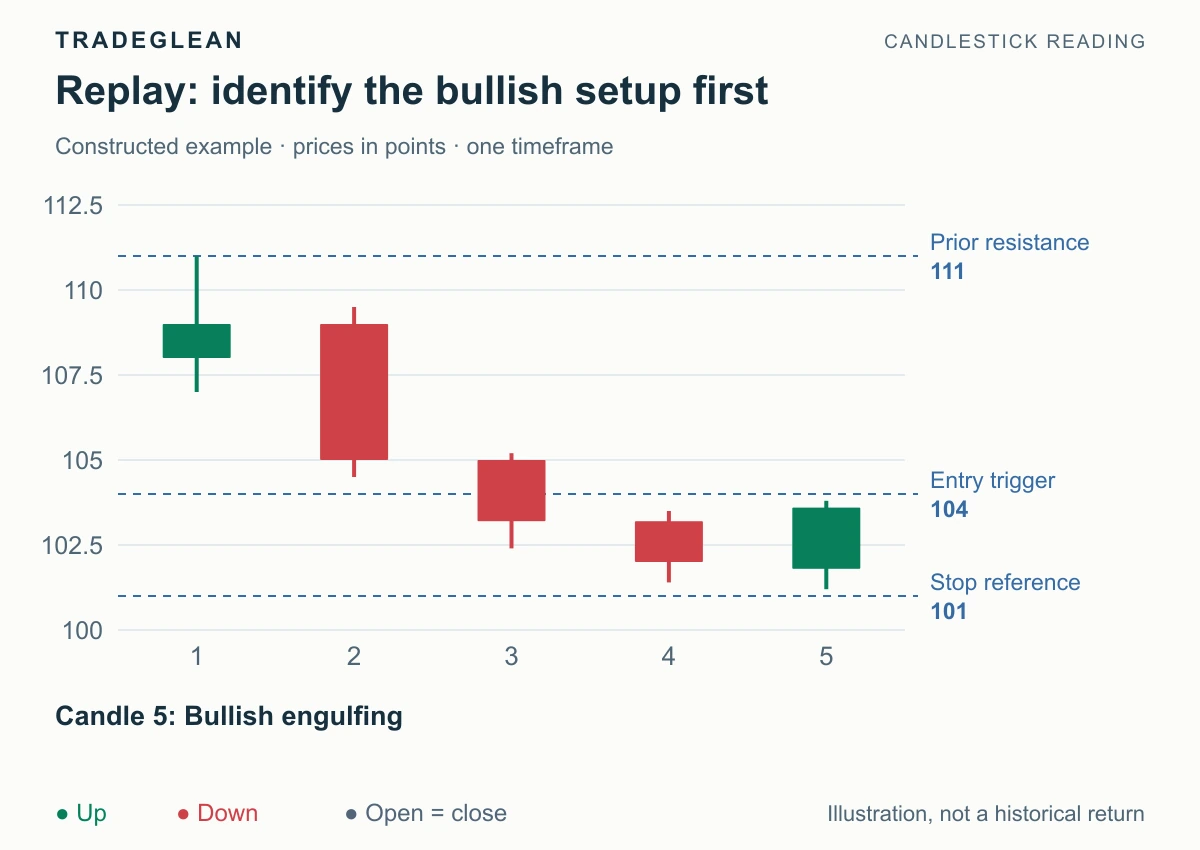
Pause after candle 5. Support near 101–102 and resistance at 111 are given in this exercise's prior context. There is no separate intervening resistance zone in the supplied setup.
Candle 4 has a red body from 103.2 to 102. Candle 5 has a green body from 101.8 to 103.6, covering both edges. The pair low is 101.2 and its high is 103.8.
The identification passes: bullish engulfing after a pullback into support. Favor an upward recovery. The practice trigger is 104, protection is 101, and the first target is 110, before resistance at 111.
Risk is 3 points; target distance is 6 points, or 2R. Space to the identified resistance is about 2.33R. Under this session's illustrative minimum-space rule of 1.5R, the entry qualifies.
Before revealing more, write: “Bullish recovery. Enter the simulation only if 104 trades in the next two candles; cancel if 101 is reached first. Stop reference 101; target 110.” The threshold and expiry are chosen exercise rules, not universally optimal settings.
Exercise 1: reveal and follow the written plan
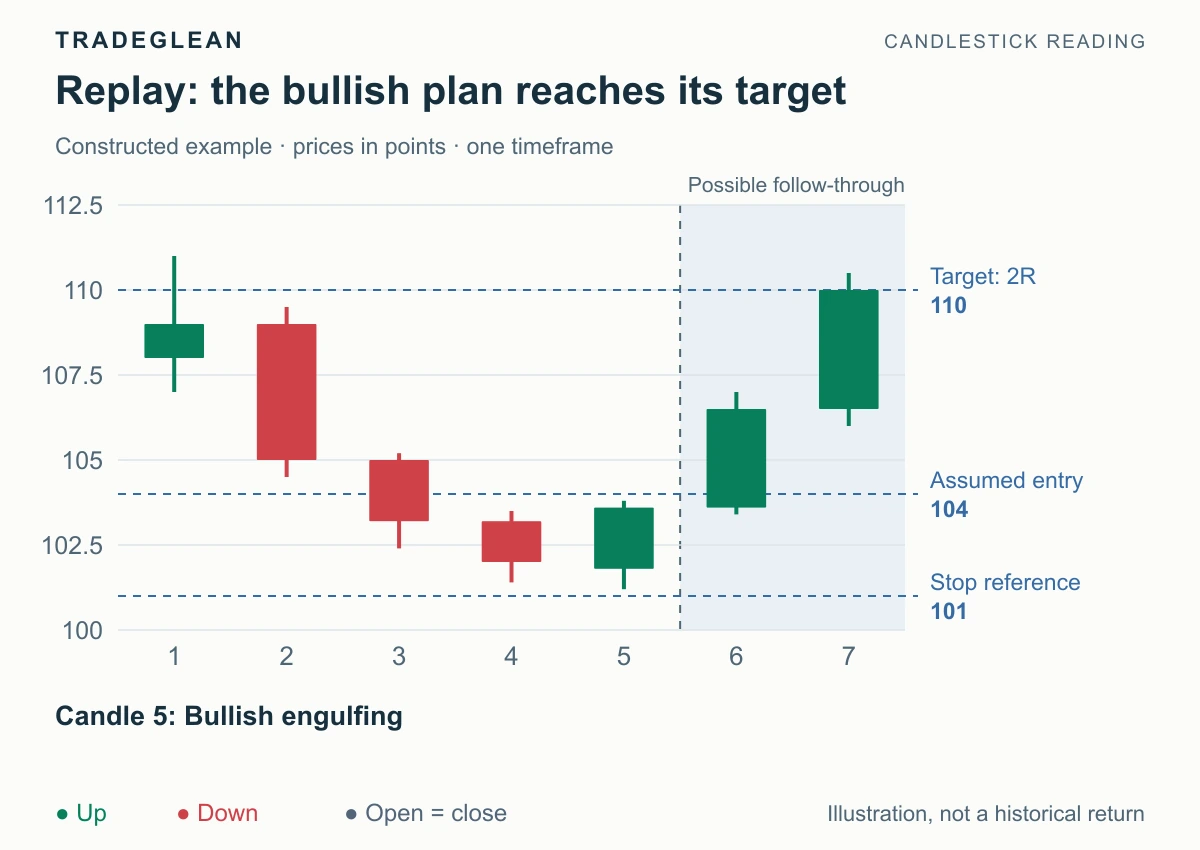
Candles 6 and 7 are revealed only after the decision. This is a paper-trading execution exercise.
Candle 6 opens at 103.6 and trades up through 104 to a high of 107. Its low is 103.4, so it does not touch the 101 stop. Assume an entry fill at 104, with sufficient liquidity and no gap or slippage. Candle 7 opens at 106.5, reaches 110.5, and remains above the protective level. Assume the target fills at 110.
The simulated price result is +2R gross. If costs equal 0.1R for this worksheet, the net result is +1.9R. Those are stated simulation assumptions; candle ranges alone cannot guarantee actual execution prices.
The useful lesson is the sequence: identify the bullish pair, state the upward scenario, wait for the recorded trigger, and take the planned exit. The successful illustration does not establish a success rate.
Exercise 2: a bullish recovery with a nearby obstacle
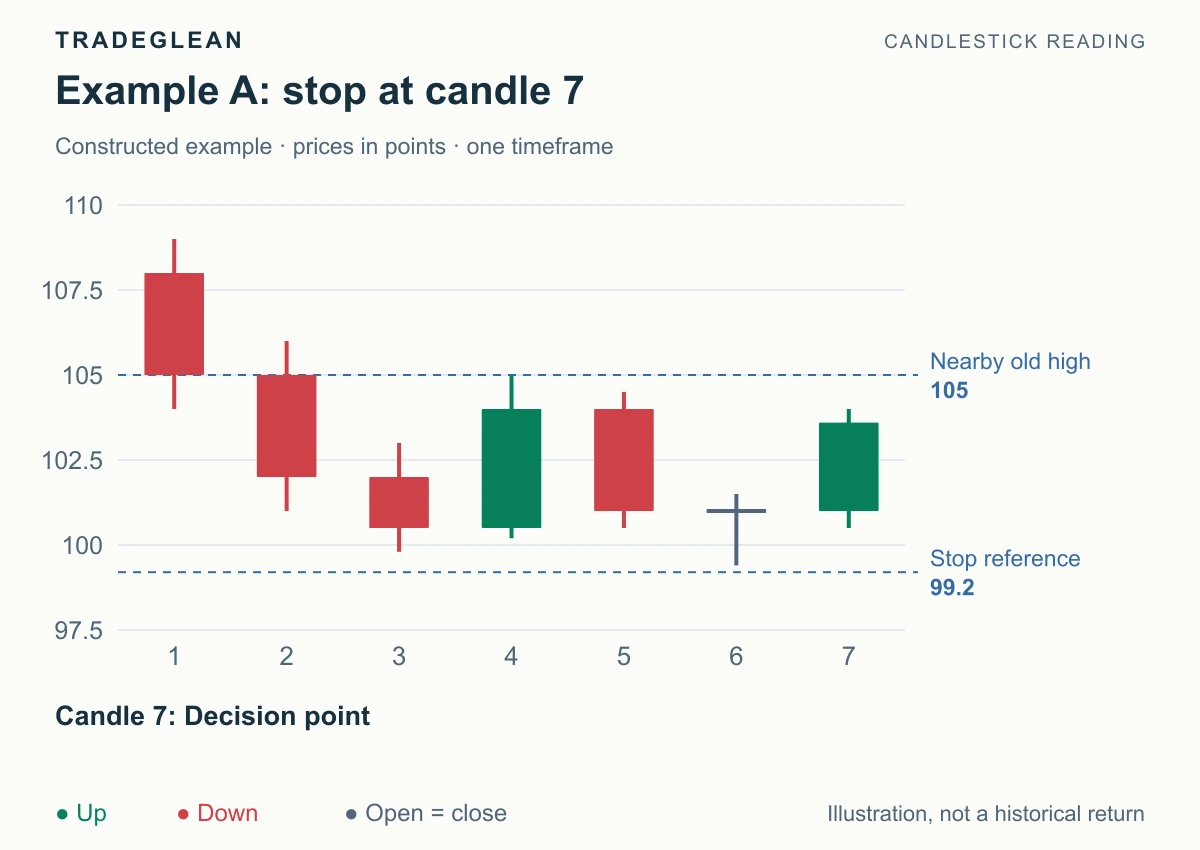
Pause after candle 7. Support near 100 is given before the sequence. The candidate entry is 104.2 and the stop reference is 99.2.
Candle 5 falls from 104 to 101, giving a body midpoint of 102.5. Candle 6 opens and closes at 101. Candle 7 then closes at 103.6, beyond the midpoint. There are no classic body gaps, so identify a completed no-gap morning-star variant.
The directional view is bullish recovery. The entry question has a separate answer: candle 4 already established a reaction high at 105. Initial risk is 104.2 − 99.2 = 5, while space to that obstacle is 105 − 104.2 = 0.8, or 0.16R.
This fails the 1.5R space rule. Record “bullish view; skip this entry; watch whether 105 is cleared and a new structure forms.” A distant target does not remove the nearer reaction high.
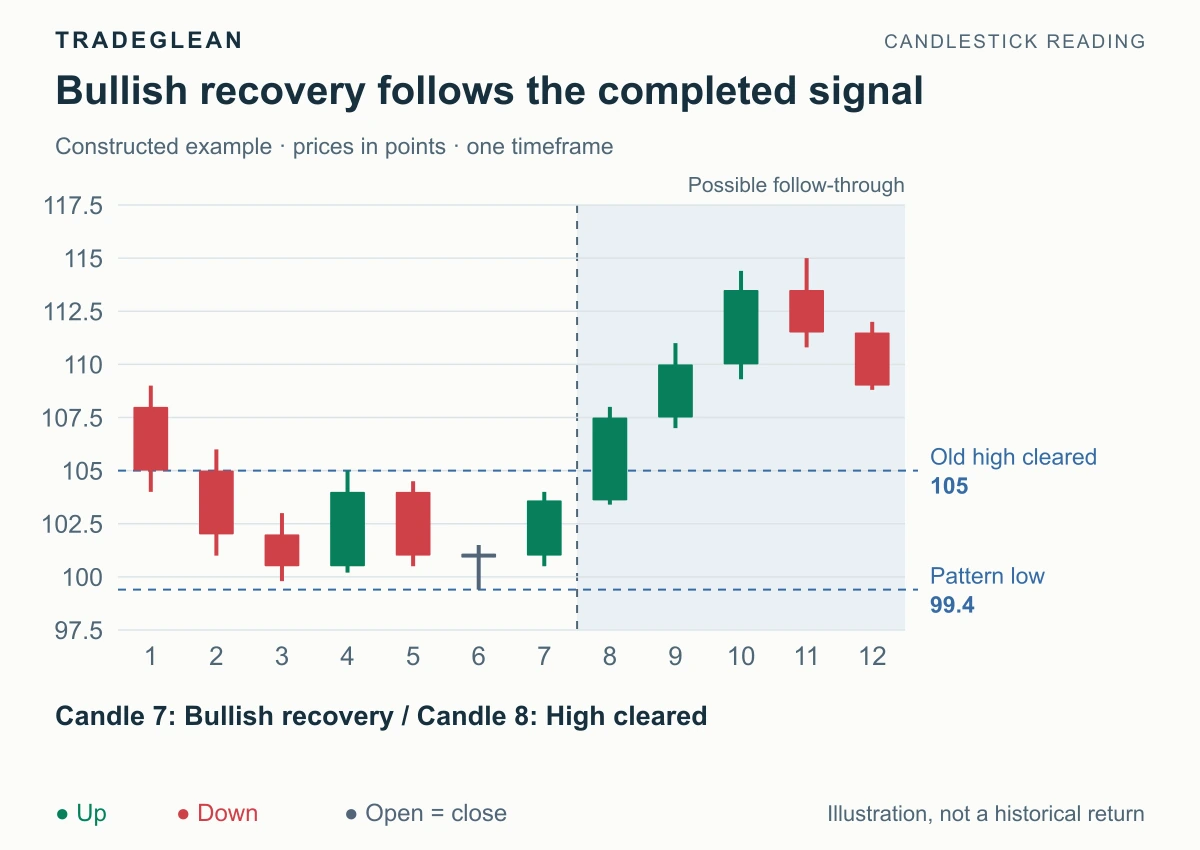
The upward scenario develops, but the skipped entry remains skipped.
The later rally supports the earlier directional reading. It does not turn the rejected entry into a trade in your journal. If a later breakout or retest qualifies under a separate plan, record that new decision at the time it appears.
Exercise 3: identify the point where a bullish setup fails
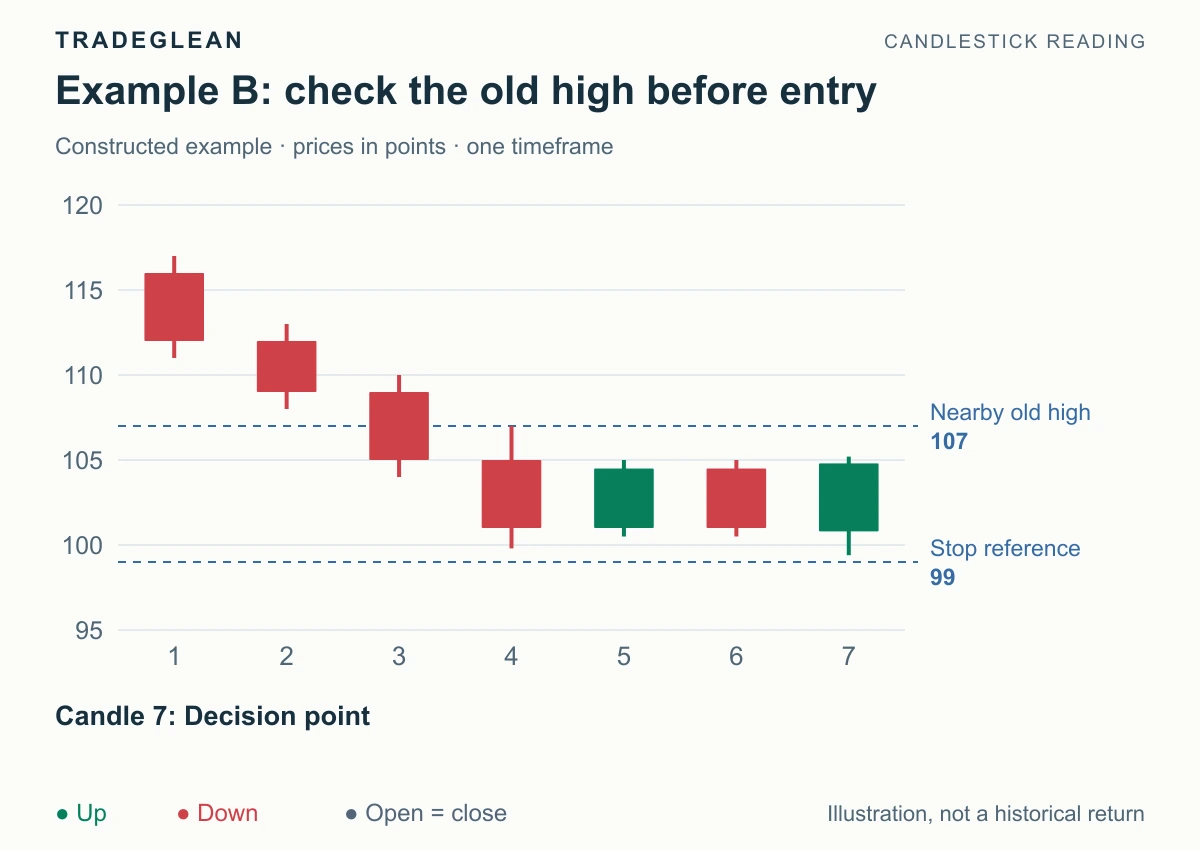
Pause after candle 7. Evaluate an entry reference of 105.5 and a protective reference of 99.
Candle 6 falls from 104.5 to 101. Candle 7 opens at 100.8 and closes at 104.8, engulfing that red body. Its low of 99.4 tests the supplied support area near 100 before recovering. This is a bullish recovery setup, with an upward trigger still to assess.
The old high at 107 leaves little room. Initial risk is 6.5 points, while space is 1.5, about 0.23R. This entry also fails the same space rule.
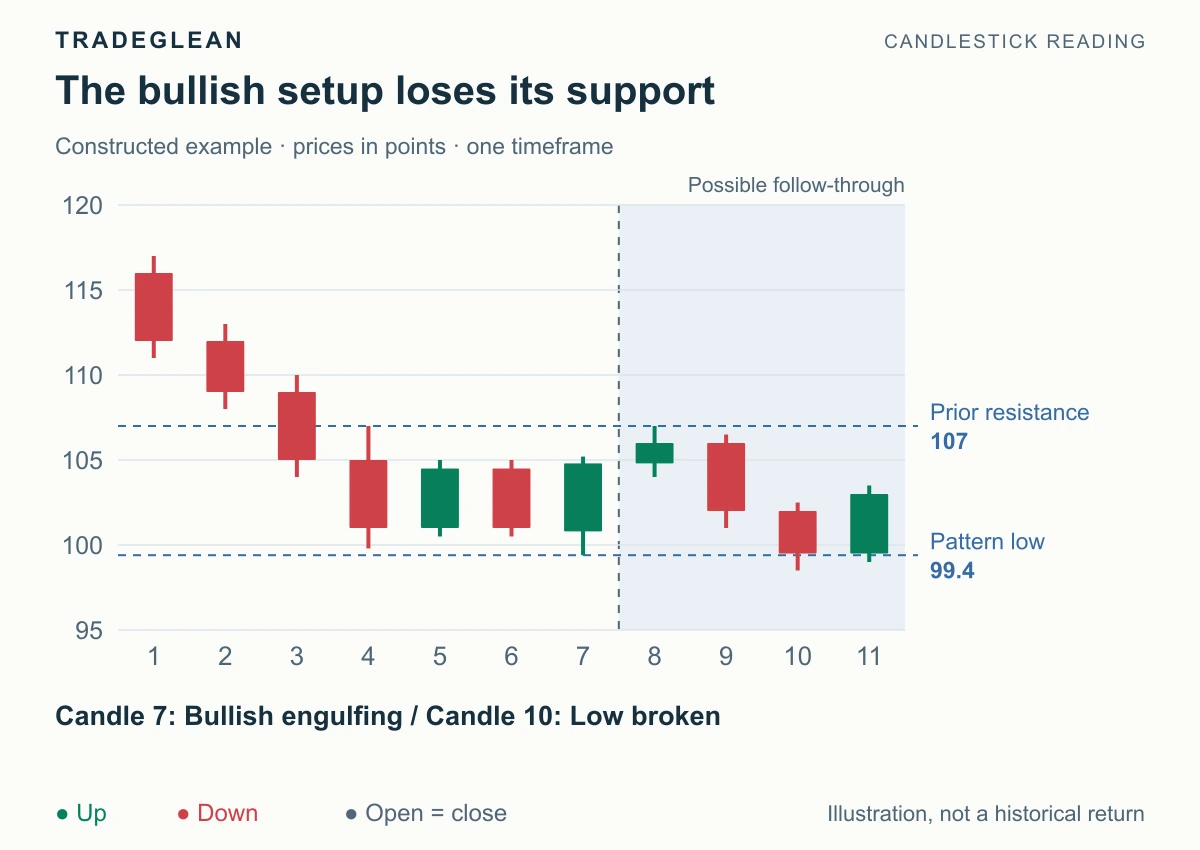
The later decline invalidates the recovery setup. The original skip decision remains in the record.
Candle 8 initially pushes higher. Candle 10 then trades down to 98.5, breaking the 99.4 setup low and the 99 protective reference. The bullish scenario is now invalidated; drop it rather than treating a later rebound as proof that it never failed.
Under the stated space rule, this was no trade. A separate simulation that deliberately assumed entry at 105.5 and exit at 99 would lose 1R before costs, but that assumed loss does not belong in this session's trade log.
Review three things separately
| Review item | Question |
|---|---|
| Recognition | Did the candles satisfy the definition at the pause point? |
| Direction | What move did the setup favor, and what would invalidate it? |
| Execution | Did an entry qualify and fill under the rules recorded beforehand? |
Exercise 1 qualifies and completes a simulated trade. Exercise 2 gives a useful bullish reading but a rejected entry. Exercise 3 begins as bullish and later reaches a defined failure boundary. For each one, the original direction and the condition for changing that view were recorded before the outcome.
Keep consecutive examples, including untriggered and failed setups. To measure performance, use a larger historical sample with one consistent set of entries, exits, costs, and instrument assumptions.
Final practice check
If exercise 2 rallies after you skipped it, was the original bullish reading useless?
Answer: No. The directional view was useful; the available entry did not meet the chosen space requirement. Record both facts. Do not add a trade or profit afterward simply because you correctly anticipated the direction.
For the planning calculations, return to building a trading plan. For execution mechanics, see FINRA's order-types guide.